 Among the various circles of treasure hunters, rumors speak of a dungeon built beneath mazes of streets and aqueducts, of a trove right under the noses of everyday citizens. According to legend, it was built by the former adventurer Zeres who elected to turn the tables on future generations of thrill-seekers and plunderers with his own tomb. None have returned from the dungeon alive (or successful enough to warrant a story), but as always, that only adds to the mystery and allure.
Finding the Dungeon
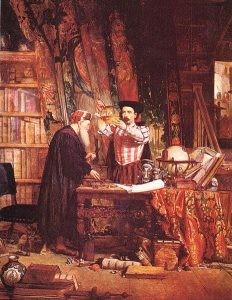
A party eager to brave the Vault of the Mad Mage must first know where to look, as well as how to gain access to the vault once found. The library of the local college has a special wing dedicated by Zeres, and the search begins among its shelves.
The directions to the vault are split into fragments, written in the margins of two of Zeres’ favorite books and obscured by magic. The hints are found in his copies of Beginner’s Dracobiology and Proper Manors: The Enchanter’s Abode on pages corresponding to the month, day, and year the library wing was opened, and they can only be revealed by casting the identify spell on the book. Beginner’s Dracobiology is often in use by the students, and acquiring the book from them may take either a DC 13 Persuasion check, a DC 11 Intimidation check, or a bribe of about ten gold. Proper Manors: The Enchanter’s Abode is ignored and untouched by the students.
The hints in Beginner’s Dracobiology include six letters in Draconic, and those in Proper Manors: The Enchanter’s Abode are accompanied by sketches of a brass sphere surrounded by three concentric rings, a door with an indent for it, and a detail of draconic script written on one of the rings. (For those who can read Draconic, it merely says “something.”) The symbols and sketches correspond to a key kept by the head librarian who will only loan it out to those who can tell him the directions in full.
Once characters have the key in hand and have found the stone door to the vault, the next challenge is unlocking the door. Each pair of Draconic letters corresponds to a pair of letters on each ring, engraved exactly across from each other. When each ring is aligned vertically within the door’s indentation, the key teleports back to the library in a flash of light and the door opens. (For those who can read Draconic, the word the letters spell out is very rude.)
Trial One: Four Switches
Across the first chamber is yet another stone door, this one adorned with four glass orbs set around the door’s archway. The main chamber splits off into two paths: one down a corridor and the other across a chain over a bottomless pit. In addition, there is a four-foot-wide channel cut vertically into the left wall, leading up into a hole in the ceiling. To open the door, characters must simultaneously have their hands on four glowing glass spheres set throughout the chambers.
The Lodestone Corridor
The 30-foot-long corridor path to the right of the entrance audibly hums, and anyone carrying or wearing metal objects feels them tug toward it. The whole hallway is filled with a magnetic field that pulls metal toward the walls, and the skeleton of a dwarf in rusted, crushed plate armor stuck to the wall serves as a warning. The switch is visible just on the other side.
Any character wearing armor made of iron or steel that attempts to cross the corridor is thrown against the wall by the magnetic force, and can only move 5 feet in either direction with a DC 15 Strength check. Characters carrying objects of iron or steel (such as sheathed or drawn weapons) must also make the check or have the item pulled to the wall as well.
Once all four switches are activated and the door opened, the hallway demagnetizes for one hour, allowing stuck objects (and party members) to be retrieved.
The Perilous Pit
This part of the challenge is relatively straightforward: cross a 20-foot-long chain to get to the switch on the other side of the pit. Crossing the chain requires a DC 15 Dexterity (Acrobatics) check, made with advantage if the character is holding a quarterstaff or similar object. On a failure, the character falls into the pit, a portal that ejects them through the front door, and back into the room.
The Climb
The channel on the left can be scaled by a character with a DC 15 Strength (Athletics) check, and leads up to a ledge holding a switch above the main chamber.
The Hidden Alcove
The final switch is behind an illusory wall on the right side of the chamber, across from the channel. Discovering the illusion requires a DC 15 Wisdom (Perception) check, made with advantage if the character is proficient with mason’s tools or has the Stonecunning racial feature (this check can be made passively).
Trial Two: The Labyrinth
Once through the first trial, characters face another, much larger challenge: a sprawling labyrinth patrolled by ghostly minotaurs. The ceiling of this cavern is 60 feet high, and the walls of the labyrinth are 8 feet tall. At the center is a tower that runs up all the way into the ceiling and to the final chamber of the vault. A soft, blue light illuminates the labyrinth, providing dim light.
Crossing the labyrinth requires a total of 5 successful DC 15 Intelligence or Wisdom (Survival) checks. These checks can be made with advantage if characters use some means of marking their path through the labyrinth or made by climbing on top of the wall. Two consecutive failures leads characters to a dead end.
 The minotaurs patrol either alone or in groups of two or three. They are alerted to the presence of characters that reach dead ends and can spot characters standing on the walls of the labyrinth. Slaying one of the patrols summons a wisp of light that flies off, showing the way forward and counting as a successful check for crossing the labyrinth (if characters follow it).
End of the Vault: The Reward
The final chamber of the Vault is the tomb of the Mad Mage himself, Zeres. The ghost of Zeres greets adventurers who make it to the end, and for completing all the trials, it offers knowledge, magic items, or cold hard coin as a reward, on the condition that none present reveal the secrets of the dungeon. Once a proper reward has been given, Zeres teleports the successful party to a destination of their choosing.

Looks like fun! I may have to drop this in when the crew next goes under.