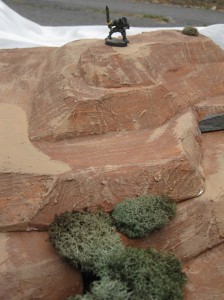
 Are you ready to “go vertical”? To discover the “third dimension” of tabletop gaming? Terrain adds something visually visceral to your miniatures gameplay. Even something as small and simple as barrels, boxes, walls, and trees can make a difference in player attention spans. (You can also buy terrain. There are many fine places to get terrain pieces, and they’re nearly perfect. This article is aimed at the artistic and/or thrifty gamers with an iconoclastic streak.)
So, how do you get started? Many start with small hills. With those, you cut a piece of foam out of a huge pink sheet, paint it, flock it, and presto! You have a hill. You can fill a box with them and reuse them. There are tons of tutorials on the web and in various miniature game guidebooks. But, what if you’re ready to go a little further?
So that big hill at the top of the article? Looks great, right? Here’s how I did it.
Assemble foam insulation, a piece of plywood for a base, some hot wire foam cutting tools, artist’s gesso (for primer), and paint. You need to cut out and glue down four layers of foam (or however many you want) to make your hill. The more layers you add, the steeper it gets. What if you’d like something a little more? A hill, after all, is big and hard to store in your basement. Still it’s a lot cooler if there’s a secret involved.
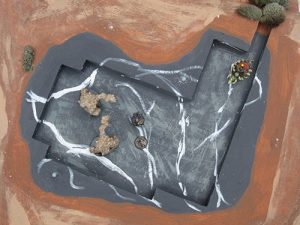
How about this?
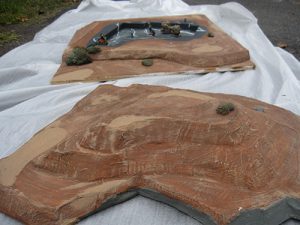
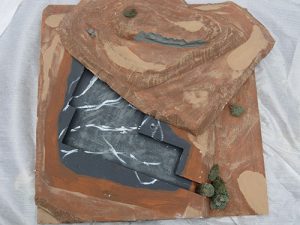
The trick? Build your hill with a plan and in stages (resulting in two pieces you store together). You will put in pegs to help the top and bottom stay secure.
To get started, you could sketch your design out to make the plan for your work. Then cut the hill out from your huge sheet of insulating foam, and cut your peg holes in the bottom. Glue it down. (Let it cure for 24 hours.) Cut the upper section’s pegholes in the lowermost piece. Glue the top two to four parts of the upper layer together. Put the pegs into the cured base. I used plaster on the bottom to hold the wooden craft pegs. If you have the correct drill bit size, you can also cut through the foam to glue the pegs in pace, then cover the joins with gesso.
Now it will move to reveal the secret!
For the detail colors, paint them on your hill all at once. To blend acrylics, you want to work from the same “base” as much as possible. (There are lots of tutorials out there for painting as well, so I’ll defer on providing painting guidelines.) For this hill, I knew that I wanted a secret passage. So I made sure to include that in the plans. When done, I got some moss from the craft store to fill the end with. It looks like bushes!
This terrain is just right for a final battle when the PCs use dimension door to get in past your hidden entrance.
Final Tip: The tactical element requires rulers, string markers, or tape measures. Unless you want to spend a lot of time drawing in squares by hand, I suggest just “free handing” with your handy measuring element so you can enjoy your terrain.

That, is pretty nifty!
I’m really enjoying these Kobold Craft articles. Whether or not I’m going to undertake the project myself, they are fun to read about. (And fun, after all, is why we play games in the first place.) I like knowing what other DM’s are doing to enhance their games. :)
Fantastic! Loving the removable sections and the secret-door-obscured by shrubs. Very reminiscent of my first forays as a player/adventurer and as a DM. Excellet craftsmanship Bill!
Perhaps gluing grid-drawn paper to the floor and then painting over it with opaque layers of acrylic? Getting craftier, laying a sheet of clear acetate with sigils/glyphs on it over the grid will add that arcane mystery when entering the lairs of cultists/necromancers/sigilomaniacs. ;)