 At least one version of the spear is found at some point in the history of every human culture. In its simpler forms, it is easy to make, easy to learn relative to other weapons, and deadly. Early versions were a simple sharpened stick. The first improvement was fire hardening the point. Later versions had bone or antler tips, followed by flint, copper, bronze, iron, and finally steel—the metals not necessarily in that order and dependent on the region.
Melee and Missiles
Fighting spears fall into two general categories: melee and thrown. Spears intended for melee usually have a double-edged blade and a good point, for the spear must be good at cutting and thrusting. Thrown spears, including javelins, may or may not have a cutting edge(s), but the focus is on the point. The abilities to be thrown accurately and penetrate deeply, in this case, outweigh the ability to cut…
A General Purpose Poker
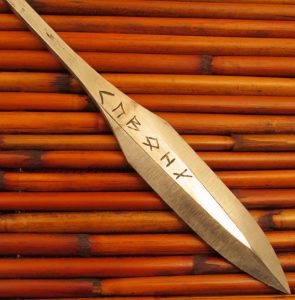
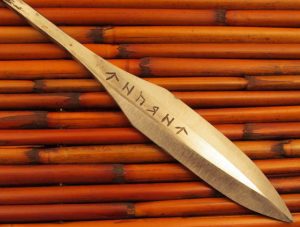
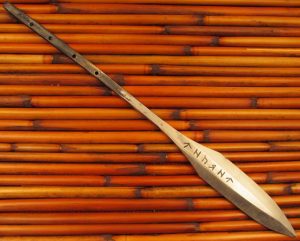
My intention is to cover specific types of spears in more detail later, but for now, let’s talk about the “general purpose” spearhead shown in the pictures. I made this one by stock removal. It’s ground from 1” × .25” 1084, which I think I’ve mentioned is my all around favorite steel. It’s on the small side with a total combined length of tang and blade of only 12” because I made it for my son, Sam, and he’s still half a pint.
 Before I get into how I made it, take a look at the runes engraved on both sides. Because this is essentially a smaller version of the fighting spears in Lord of the Rings, I used Tolkien’s dwarven runes, which he based on Elder Futhark Germanic-Norse. One side says “Samuel”; the reverse says “Reaver,” which is the name he picked for the spear.
It’s Sharp First, Then it’s Tangy
When I make a blade like this, whether by forging or stock removal, I like to form the blade first and leave the tang for last. I do this because it leaves me something substantial to hold onto while I work on the blade. I ground the profile (silhouette) first, then the bevels. This is the first time I’m showing you a double-edged piece—and that’s important. A blade like this, which is basically a dagger blade on a really long tang, has four grinds—all of which meet at the point. If I hadn’t left large flats for engraving, the bevels would also have met on each side. The reason this is significant is that the human eye can detect a mistake of only a couple thousandths of an inch. All these angles coming together are “hotspots” for errors. In fact, the tip of this spear has a bevel issue I need to correct. Can you see it?
Creating the tang is relatively simple. In this case, I started with band saw cuts and finished on the belt grinder. If it were forged, the tang would be drawn out by hammer or hydraulic press. The holes are for “glue pins”: when I set this in the haft, I’ll use epoxy, which will fill the holes and help hold it in place.
 Temperamentally Tempered
After rough grinding and engraving comes hardening and tempering. Double-edged blades are notorious for twisting and warping during hardening, but there are a few things that can minimize the risk. I use clay hardening, am very careful not to overheat, and leave the blade on the thick side—all these things usually allow me to have a trouble free hardening. Because a spear will be subjected to a considerable amount of abuse, toughness is more important than hardness, so I temper them fairly soft.
The Finishing
There’s not much point in putting a fine finish on a spear—it’s going to get dinged up. A serviceable satin finish will suffice.
The blade is set in the haft, and it’s done.
The forge is now open for the season, and I’ve done a few warm up pieces. There’s good stuff coming soon!

1) Excellent stuff
2) I think I can see the error, it seems as if the point on one side is more pronounced than on the other side?
3) Last week I visited your site, your blades look great!
Spears, or their close cousins, were pretty much the ‘go to’ weapon for most of human history. Nice to see them getting some spotlight time.
Would like to see this once it is set in the haft.
Thank you.
Awesome!!!
Where do you get your steel for making spears and knives? My boy and I would love to make one too.
@Darkjoy –
1) Excellent stuff
– Thanks! It’s always my pleasure.
2) I think I can see the error, it seems as if the point on one side is more pronounced than on the other side?
– Bingo, the ridgeline is off center on one side.
3) Last week I visited your site, your blades look great!
– Thank you. I’m trying to get some in the “available” section.
@Sean – I couldn’t agree more. As I commented on one of Alex’s article’s, Jim Hrisoulas, who is arguably one of the best “old school” bladesmiths in the world, called the spear the “medieval weapon of choice”.
I’ll get it hafted in the next couple of weeks and post it on my website – c’mon by and take a look!
@Wothbora – I have several sources for steel. IMO Aldo Bruno – “The New Jersey Steel Baron” has the best steel available. Go to http://njsteelbaron.com/
I’d be happy to be available by email and/or phone to help you with your project.
You can reach me at todd(at)toddblades(dot)com
Spear: The Blue Collar Weapon. I’m looking forward to more.
@Thorr-kan
Pitchfork is the Blue Collar Weapon :-)
@Todd
Maybe you can craft a Pitchfork of Doom?
I am seized by an urge to create a +1 pitchfork of doom and see whether the players would go for the peasant-mob look or not…
Maybe a +1 torch as well.
torch = small flaming club +1
But Wolfgang, just go for it, you know you want to :-)
Yeah, I like the blue collar angle. I think the spear is the weapon of choice for the blue collar fighter and the pitchfork is the same for the peasant who’s pressed to fight.
Would an unruly mob be the least bit scary w/o pitchforks and torches? Methinks not!
odd question:
isn’t it best for any double sided spear/arrow-like weapon that would be *used for real, that is* to be given a semi-chisel tip point?
i.e grinding the angle where the bevels meet for say 1/6th of an inch down flat on both sides so end is not a fine spike, which tend to stick in bones and also break.
:)
SilverbladeTE, I am pretty sure that the yari uses just the sort of point you describe.
Not sure about the more European spears.
@SilverbladeTE – Wolfgang is correct about the chisel grind on the yari.
I’m not 100% certain I understand what you’re describing, but there are two ways to strengthen a point by using it’s shape. The profile of the point can be widened – a wider angle on the point – or the same thing can be done with the bevels. A chisel ground blade, like the yari, is actually more fragile, but much sharper because the bevel angle is more acute.
I talk about this a little here: http://www.koboldquarterly.com/k/front-page8459.php
Risk of breakage in any blade shape can be reduced with softer tempering – with the payback being loss of edge retention.
Without drawing some pictures it’s hard to know that we’re talking about the same thing, but I hope this helps.