Throughout 2023, a roster of Kobold Press superstars are working together to create a full dungeon for the Dungeon23 project. Each installment contains a few areas that will stack up to a full delve! Catch up on previous articles here.
Dungeon 23 Community Highlight
Will Doyle is posting his Dungeon 23 entries in this Twitter thread. Will provided cartography for many adventures from Wizards of the Coast, and his dungeon uses some cool isometric sketches in its layout.
Dungeon Prompts
I’ve been given seven words to help inspire dungeon design:
- Cluttered
- Crooked
- Lavender
- Disturbed
- Torpid
- Tame
- Frequent
I don’t need to use any or all of them, but they are cues to consider using when searching for inspiration.
The Dungeon Map
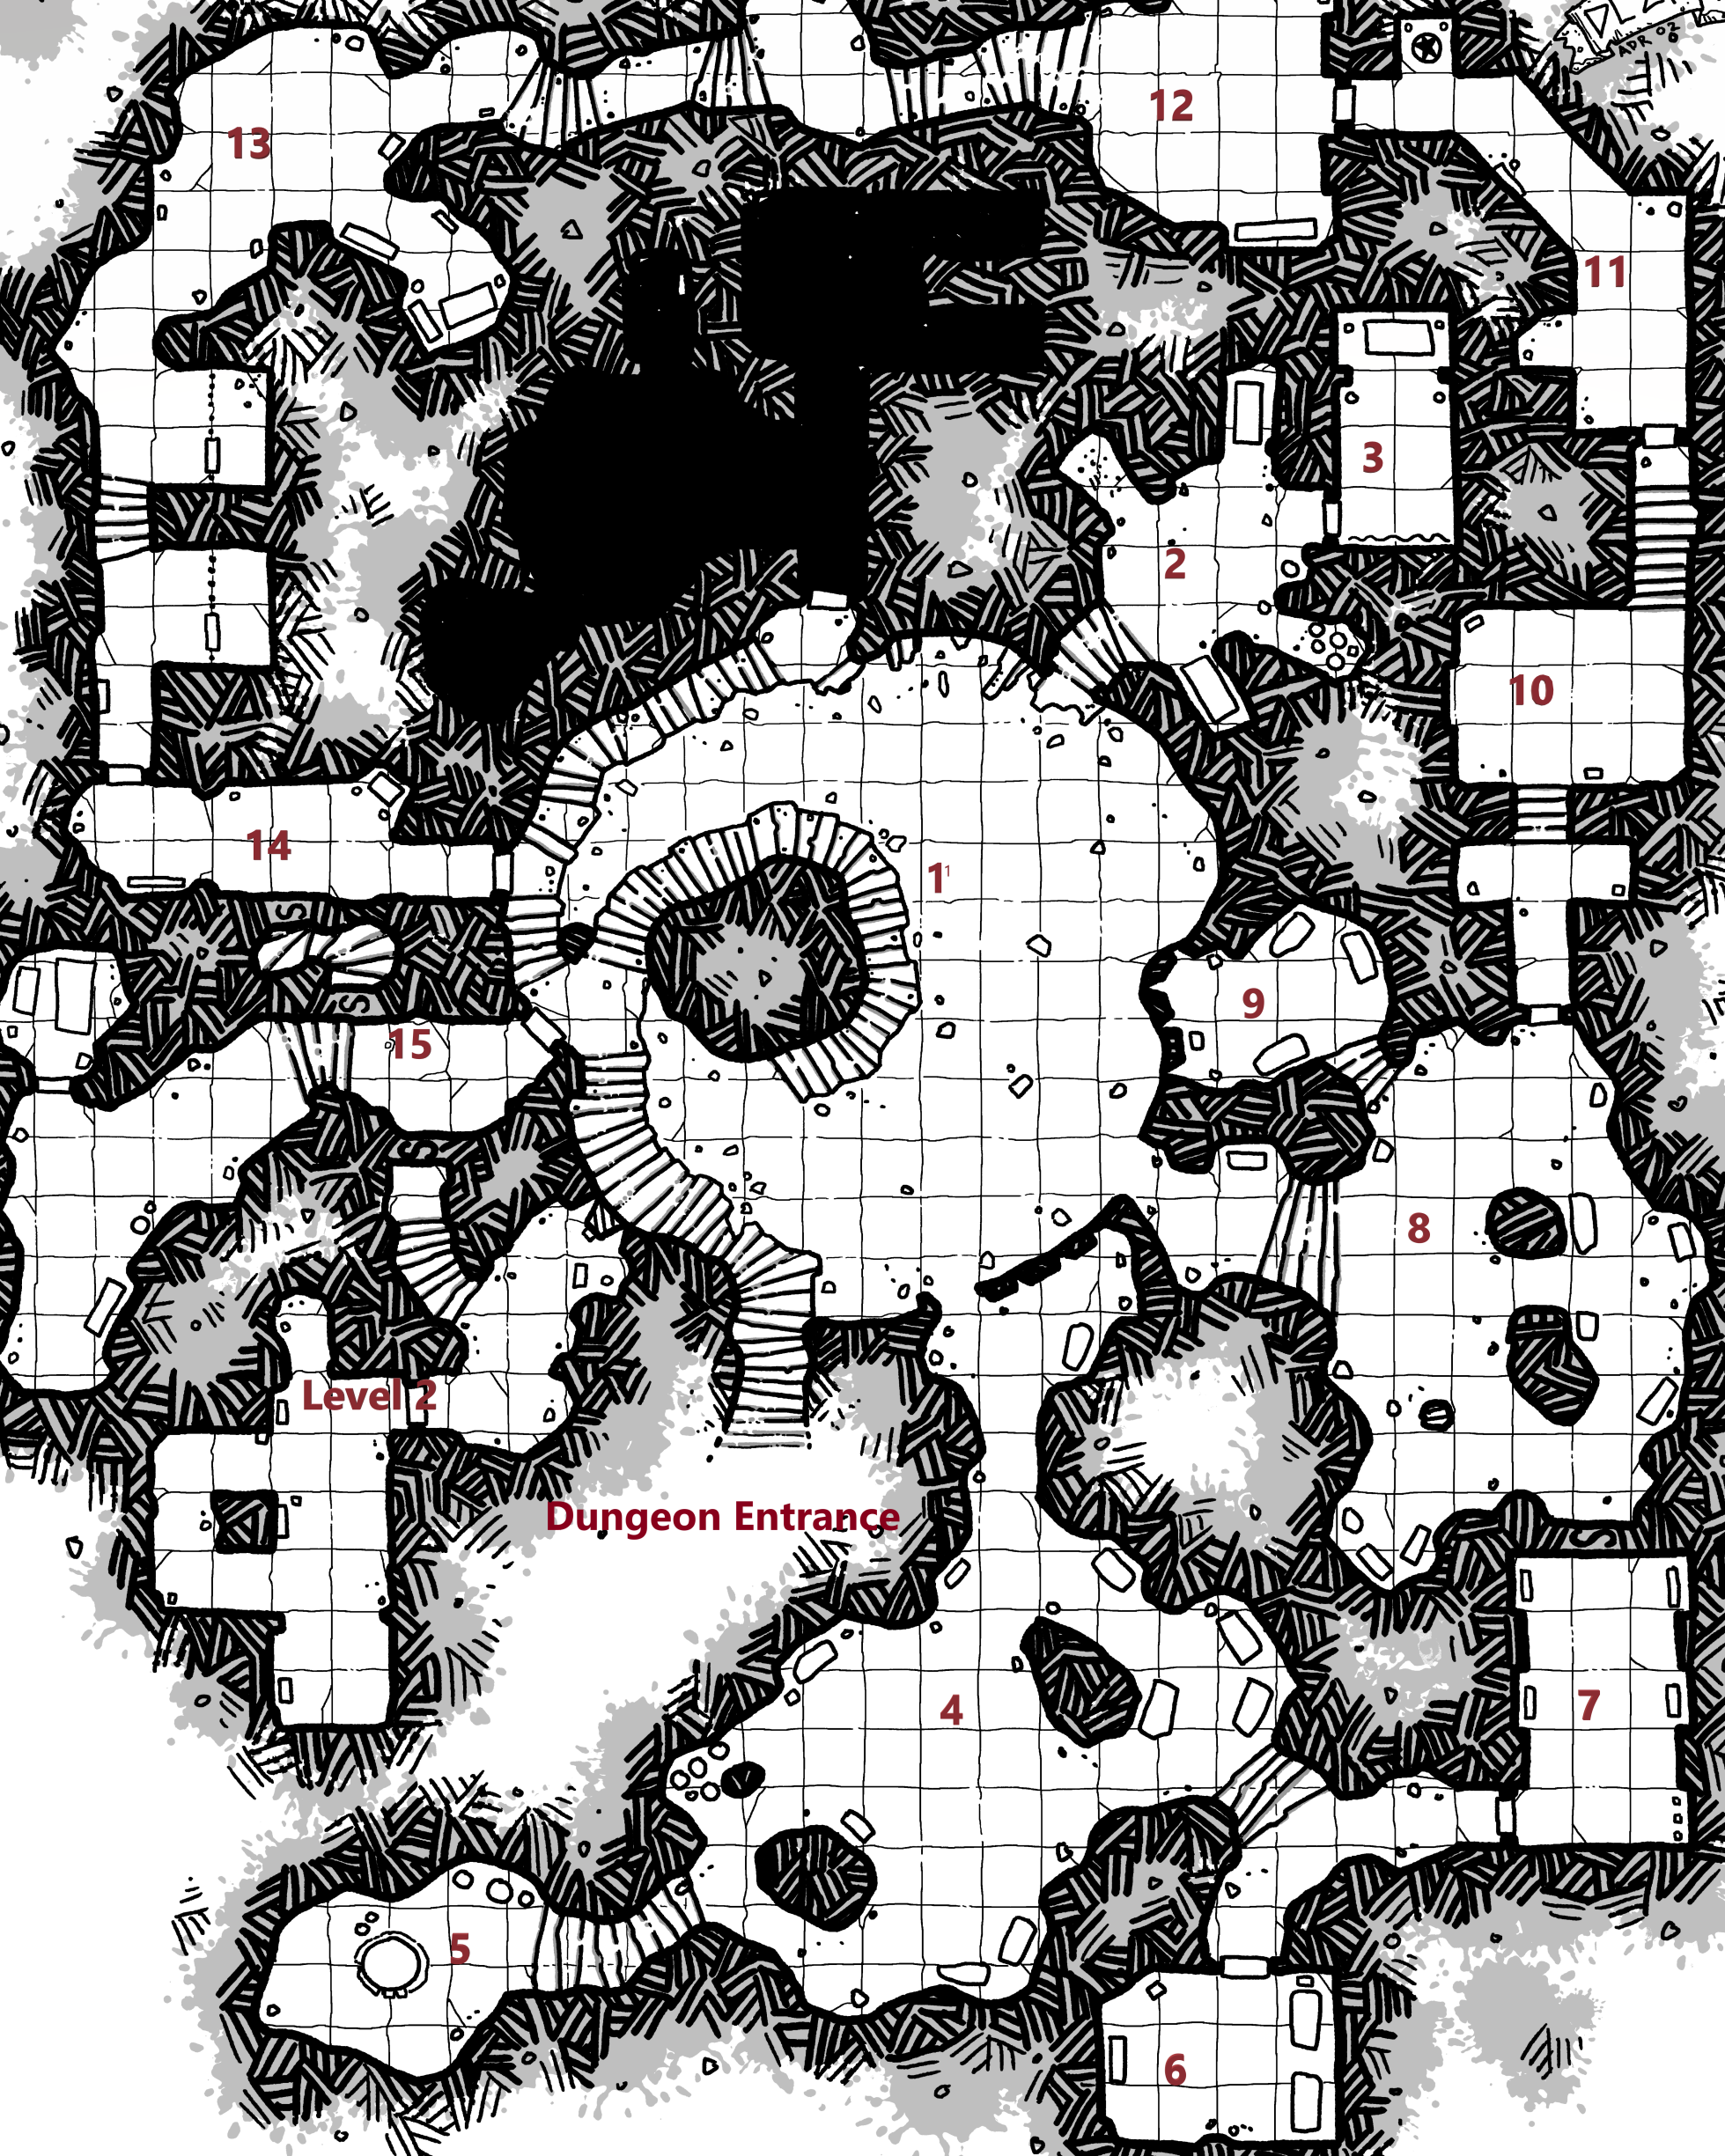
This level of the dungeon uses a Dyson Logos map, The Twilight Descent (use this link for a player version without area numbers).
This map provides several chambers for the PCs to explore while pursuing their adventure hook, which they will achieve on the second level.
This installment of the dungeon covers areas 12–15.
Area 12: Lizard Den
The door from area 11 opens to reveal a 3-foot-high fence of stakes that block the archway into area 12.
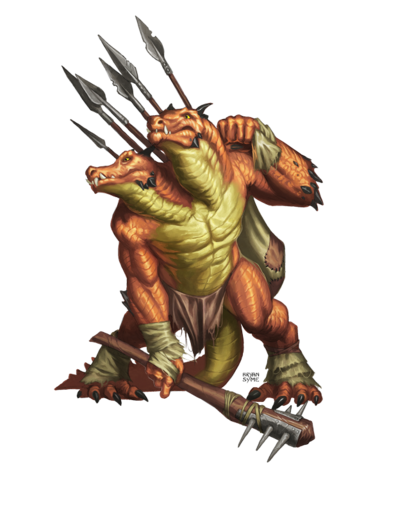
| A horned lizard the size of a pony rips chunks out of a fibrous stalk and gulps them down. Its den has a dry, fetid stink. |
This wasteland lizard (available for preorder in Wastes of Chaos) eyes anyone entering the area warily while continuing to eat. The kobold alchemist in area 13 uses the lizard as a guard, but it is tame and ineffectual as a guard. If attacked, it tries to escape to Area 13. It follows any PC who offers food, but it flees from combat.
This room was originally a preparatory room for rituals performed in Area 11. A stone slab bench along the south wall is covered in with lizard droppings. PCs who clean the bench see inscriptions of whirling motifs dominated by the outline of a strix.
| Designer Insights: Dungeon Prompts When designing these areas, I did a keyword search in recent Kobold Press books using dungeon prompts. Lavender yielded void fungi, tonic for the troubled mind, and incense of recovery. The tonic combined with torpid and disturbed gave rise to the kobold ettin in Area 14. These swirled together to make the kobold alchemist in Area 13, who clearly needed a tame creature that lived in this room. It’s kind of like rolling on a table for inspiration using every PDF you own! |
Area 13: The Apothecary’s Chambers
Lemmelash, a kobold alchemist (see Tome of Beasts), grows unusual funguses in the cells in the southern half of this area, and conducts experiments on them in the chamber to the north. His most effective brew is the tonic for the troubled mind (see Vault of Magic) which he provides to Grimmengrout, the kobold ettin in Area 14.
The alchemist is as timid as his lizard. He offers to help the PCs if he believes they might eliminate Grimmengrout, so he can spend more time on experiments.
Read or paraphrase the following when the PCs enter the main cave to the north:
| The passage opens into a large cave. Various pots and small tools are scattered about. Fist-sized clay vessels line the walls of a nook to the southeast, and a bedroll is laid out near the far wall. Another passage opens from the main cave headed south. |
The main cave contains fresh samples that Lemmelash has collected from the nooks to the south. Trowels, jars, and stirring rods are littered about the area.
Lemmelash’s samples are harmless when separate but unpredictable when combined. There is sufficient fungus to create three reactions, which can be predictably repeated. Roll on the table below to determine effects.
| d4 | Effect |
| 1 | The combination hisses and releases green gas in a 10-foot radius that lingers for 1 minute. A creature enters the radius for the first time on a turn or starts its turn there must succeed on a DC 12 Constitution saving throw or be poisoned for 10 minutes. |
| 2 | The reagents fizzle and spark, casting bright light in a 50-foot radius. Any creature in that radius must succeed on a DC 12 Dexterity saving throw or be blinded for 1 minute. |
| 3 | The commingling makes a booming thunderclap that can be heard up to 100 feet away. Creatures within 20 feet must succeed on a DC 12 Constitution saving throw or be deafened for 1 minute. |
| 4 | The combined funguses emit a cloud of spores, heavily obscuring everything in a 20-foot radius. |
Lemmelash’s nook contains various trinkets, such as broken pottery, wasteland lizard baby teeth, and multicolored stones, as well as a dose of tonic for the troubled mind and a block of incense of recovery (see Vault of Magic).
Read or paraphrase the following when the PCs pass the nooks in the south of this area:
| Two cells have been chiseled out of the eastern wall of the passage. Iron bars are set across the gap, and multicolored fungus and lichen grow in the cells. Some patches glow with a lavender light. |
Inside each cell door is a void fungus (see Tome of Beasts 3). Its purple fungal patches shed dim light for 10 feet. The fungus is generally dormant but is awoken by any alchemical thunderclap or if the PCs fail a group DC 11 Dexterity (Stealth) check.
If awoken, the void fungus tries to charm PCs with its Void Fungus Hazard, drawing unwitting creatures to into the cells where it uses its Consume Energy feature. (If Lemmelash is with them, the fungus ignores the PCs.)
The cell doors are unlocked, but its bars serve to both keep nosy kobolds out of the garden and to keep the fungus in.
| Designer Insights: The GM is a Player Too Random tables do more that leave things to chance. You can skip rolling and use them for inspiration, or let yourself be surprised and play to find out what happens! |
Area 14: The Torpid Throne
| Loud snores are interrupted sporadically by rumbling belches. A stout, two-headed kobold slumbers on a stone throne in the northeastern corner. A gold crowns rests on his left head, and a tin crown on his right. Doors lead out of the room to the east and north. |
Grimmengrout, a kobold ettin (see Tome of Beasts 3) “rules” from this shabby throne room. The ettin bullied all the other kobolds on this level until Limmelash developed his tonic for the troubled mind, which soothes Grimmengrout and puts him to sleep for hours at a time.
Each creature entering within 10 feet of Grimmengrout must roll a d4. On a 1, he unleashes an Echoing Burp and wakes up. Grimmengrout is angry if woken, but is also poisoned for 1 round while he fully awakens.
Grimmengrout wears a golden crown worth 200 gp on his left head and a tin crown worth 5 sp on the right. PCs who point out the difference between the crowns and make successful DC 14 Charisma (Persuasion) checks incapacitate the ettin until the end of its next turn as the two heads argue about their relative importance.
PCs searching the southern wall who make a successful DC 12 Intelligence (Investigation) check locate a secret door leading to Area 15. PCs searching for treasure here locate the door with a successful DC 15 Wisdom (Perception) check. By pressing into the stone doorway, the passage opens in front of them, remaining open for 1 minute.
PCs who located the porcelain mug in Area 11 can enter and exit from this area through the door to Area 1.
| Designer Insights: Balance by Other Means The kobold ettin can be a danger to 2nd-level characters. When characters are punching above their weight, try providing a few ways for clever players to reduce the threat. |
Area 15: The Forgotten Shadow Vault
| A door leads out to the east. Natural stairs to the west lead up to an irregular cavern. A stone door is set into the northwest corner of that cavern. An arch of mortared stones in the southwest is filled with the darkness of a moonless night and has an altar before it. Gouges on the floor lead into the southern wall. |
PCs who befriended the living shade from Area 7 can enter and exit from this area via Area 1 with the shade’s assistance.
The arch emits magical darkness with a faint aura of evocation magic but has no other effect. The shadow cultists who built this dungeon would present their newly created magic items before the darkness in a ruinous ritual.
The stone door to the north can be broken down or pried open with a successful DC 14 Strength (Athletics) check. Inside, the mummified remains of a cultist lie on a slab. The cultist wears a ring of shadows (see Vault of Magic) on its left index finger, which can only be removed by cutting off the finger. Two vials are in its right hand—a wisp of the void and a liquid shadow (see Vault of Magic).
PCs who inspect the wall near the gouges automatically detect the secret door leading down to the second level.
| Designer Insights: Milestone XP Instead of XP bookkeeping, you can decide that PCs gain a level once they’ve achieved a significant goal… like finishing all the areas in a dungeon level. For purposes of this dungeon, they should reach 3rd level before delving deeper. This gives them confidence in their abilities and means to face bigger baddies on a lower level. |
Delving Deeper
In two weeks, descend to the second level of the dungeon!
If you’re looking for a notebook to jot down your Dungeon 23 ideas, check out the Kobold Press TeePublic page!
