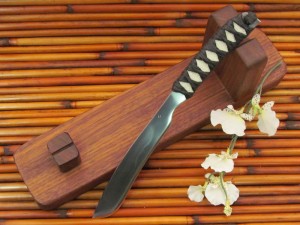
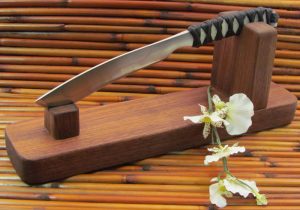
 One of the many cool things about bladesmithing is that if you come up with a new design or even a twist on an older one, you get to name it. While recurves are nothing new—and even Japanese recurves have been done many ways—the overall pattern of this knife, to my knowledge, has never been done before.
Planning… or Lack Thereof
Sometimes, as with this knife, I start forging without having anything particular in mind. Part of the creative process is to think less and just do. It involves transferring control of the hands—and therefore the hammer—from the conscious, logical part of the brain to a deeper, simpler, more creative part. This part of the brain doesn’t think with words; it instead holds a cloud of concepts.
For this knife, I charged the creative part of my mind with two concepts: elegance and lethality…
 Forging the Razor
The razor started as a round bar of 5/8” W1 steel. The “W” stands for water quenching (though I quench it in oil), and the “1” indicates the formula #. “1” is a common form of W steel although “2” is making a comeback. The formulas are very simple and similar with W2 having some vanadium, which makes it tougher and more easily manipulated into forming a complex hamon.
I started by striking the tip while rotating the bar, forming a point. I then used my hydraulic press to flatten the bar and create the initial profile. I refined the profile by hand hammering—by this time, knowing I would be making a recurve. Next is the forging of the bevels, but this presents a problem with a recurve: as the bevels are forged the spine is forced backward, and a recurve is supposed to bend forward. I counter this effect by frequently forging small adjustments, forcing the tip down over the horn of my anvil. When the forging was done, I normalized and annealed the steel, refining the grain structure and softening the steel in preparation for hardening and grinding.
Grinding and Heat Treatment
Since I’ve done a good job forging, the rough grind didn’t require much more than removing forge scale and touching up the profile and bevels. This knife was differentially hardened, using a clay application along the spine resulting in a hamon which can be seen in the accompanying pictures. As always, tempering follows hardening to draw back the steel to a usable hardness, followed by final grinding and polishing.
Can You Stand the Handle?
The razor has a fairly traditional Japanese handle treatment: stingray skin underlay and black cotton maki (wrap), which is impregnated with a phenolic resin to harden it and hold it in place. This is purely an art knife, never intended to be carried, so instead of a sheath, I made a stand from black walnut.
Why Recurve?
A recurve blade has tremendous cutting power when compared to straighter blade profiles. The trade off (remember, it’s always a trade off) is they are generally not great stabbers when compared to straighter, narrower blades. Some historical examples of recurve blades are the kopis, falcata, and kukri.
I think it came out OK. What do you think?
As always, your questions and comments are most welcome!

Todd,
The lines of the blade are not something I would expect from a blade – it must be a cultural conditioning thing – I see a Japanese style handle so I expect straight lines and your blade is all curvy!
Have your tried to cut anything with it?
@Darkjoy – Because I made this with the intention of selling it (Which I did :) ), I didn’t do a lot of cutting with it, but I always test my edges on paper, and it cut aggressively. I prefer a smooth transition to sharp shoulders (see the defined “plunge”, or shoulders on this blade: http://www.toddblades.com/available.html), and a smooth transition lends itself best to a convex edge, which doesn’t have the edge potential of a flat grind or hollow grind.
Now there’s a thought for a future Real Steel – edge geometry and grind types…
Pretty. Glad you got the sale.
The photo reminds me a little of a straight razor not quite completely open. Appropriate, I think.
@thorr-kan – Thanks! A straight razor was the look I was going for.
Spend the $ wisely :-)
Anyway, good to see your site updated, I must say I really like the frankenstein kiridashi.
@Darkjoy – All the $ goes back into tools and materials. :)
My site was down while I switched hosting services. If you get a bad one, well, it stinks!
I think the frankenstein kiridashi came out pretty good for something so simple.
Thanks!
http://www.toddblades.com/gallery-of-past-work.html
That is a beautiful knife! Very lovely, and I adore that stand.
@Liz Staley – I like words like beautiful, lovely, and adore attributed to my work…
Thanks!
:)
This is really gorgeous Todd! I complete agree with thorr-kan, as soon as I saw the pic, I thought it was an instrument for shaving – have you tried shaving with it? :)
I’m really glad that you’re back with a new host, your posts are the reason I subscribed to Kobold’s newsletter and I’m always excited when it’s in my inbox!!
You should do a series of posts about the tools you use and your methods and processes. I bet it’d be really interesting!
And I’d be interested in edge geometry, because it always confuses me when blade people talk about it.
@James – It’s got a convex edge, so it couldn’t ever be made sharp enough to shave comfortably (it could do it, but it would pull badly). Razors traditionally have a hollow chisel grind – I’ll cover that soon, and something with a shop tour and some tools is in the works also.
@Wolfgang – edge geometry comin’ up. I haven’t forgotten about something on maces also…