 Coins. Gold, silver, bronze, and copper. Throughout history, they’ve been struck, cast, engraved, and cut. Their style and artwork are a reflection of the culture that created them. It’s no surprise that coins are being used in gaming. They can help build the flavor of a world and give insight into the religions and art of the culture.
When Wolfgang asked me if I could make custom, handmade coins for the Southlands Kickstarter project, I had to admit that I hadn’t done it before, but that I’d like to try to figure it out.
Dies, Striking, and Casting
The first method we discussed was striking. Striking is a great method for long runs, but it’s impractical for a short run. There’s too much time and effort involved in engraving the dies to make what will probably be a few hundred pieces at most. Casting is also better suited to long runs, and I’m not set up to do it.
So, who’s heard of sintering?
Sintering
Sintering is a metallurgy process where a finely powdered metal is brought up to a temperature at which the grains will stick to each other, effectively forming a piece indistinguishable from the metal in its solid form. It requires lower temperatures than casting and allows the metal to be worked cold—at room temperature, in fact.
From Start to Finish
The process I used has a lot of steps. None of them are very complicated, but there are a few specialized pieces of equipment and some unusual materials. The metal itself can be pretty finicky about being shaped and fired, and there was a fairly long and sometimes challenging trial and error process.
The Art
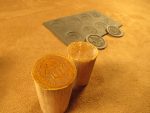
Wolfgang somehow finagled my brother, David, into doing the art for the Southlands coin. I made a negative transparency from the original art, and I used the negative as a mask to create a mold on photopolymer plate.
So, here’s the longer explanation: The original art is a positive digital image, which I turned into a negative printed transparency, which I used to make a positive mold from photopolymer plate. The photopolymer is then used to make a negative mold in PVC polymer, which is used to form the positive image in the metal powder. It got a lot more complicated than I had hoped because the photopolymer plate was overexposed when I used a positive transparency mask, and decreasing the exposure didn’t help. The negative allows in much less light and worked out fine. Did you get that? It gave this dyslexic metal bender a brain cramp. (Feel free to ask questions in the comments if you’re still lost.)
The Metal
We may go to other metals at some point in the project, but as of now all the coins are being made of bronze. I started with a 44 micron bronze powder, and mixed it with methylcellulose and water, forming a paste. With some tinkering, I got the metal to a consistency like putty or clay. There is, in fact, commercial metal clay that would have been much easier to use than my own formula, but it costs so much more that it would have made the project impractical.
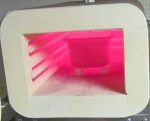
Molding
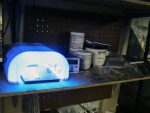
The PVC polymer molds are sprayed with a releasing agent, and a ball of the metal clay is placed between the two halves of the mold. The two halves of the mold are squeezed together until the metal clay barely begins to bulge out of the sides. One side of the mold is removed and the other, with the metal clay on it, becomes the bottom. The clay has to be dried with the bottom mold in place for about 30 minutes at 150° F. It can then be removed from the mold and flipped over to dry for another 30 minutes.
Pre-firing
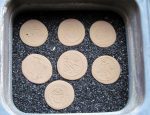
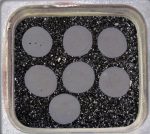
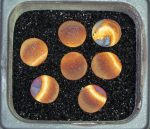
The methylcellulose used as a binder will prevent the bronze from sintering, so it has to be burned out prior to firing. This is done by pre-firing at 1000° F in an oxygen-rich environment, which facilitates the burning of the binder. The burn-out happens quickly and no hold time is required. The pieces come out of the pre-fire blackened.
Firing
Firing is done in an oxygen-poor environment because oxidation prevents sintering. This is done by burying the pieces in carbon. The carbon burns and deprives the atmosphere in the sintering pan of oxygen. I found that coconut shell carbon works well. Firing at 1470° F with a two-hour hold time yielded a strong and complete sinter. The firing process leaves the coins with peacock oxidation colors. A quick tap with a metal spoon reveals that they are now solid metal.
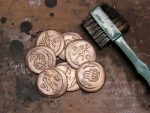
Clean Up and Finish
The process is tweaked enough that surface finishing can be done with a handheld wire brush. They could be buffed to a high shine, but that’s not the antique finish we’re looking for. The edges are trimmed and finished on a belt grinder, leaving a scratch pattern similar to the reeding found on the edges of many coins.
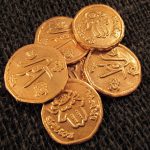
And… Coins!
Questions, as always, are most welcome.
Very cool process. The examples you show above of each step are great!
–M
Thanks, Mark. I was concerned it would be hard to follow.
FYI the pictures all have a descriptive label that you can see if you click on them.
Sintering. Huh. That’s a coining methond I’ve never heard of before. It’s a lot different than the Winnipeg branch of the Candian Mint we toured a few years ago. (Aside: take the opportunity to tour it. They do Canadian coins and coinage for other countries that have less…secure minting facilities.)
With all the setup, are you *sure* it wouldn’t have been quicker to carve the dies and stamp the coins? Our SCA kingdom has a coin making guild. It’s always fun to watch somebody hand-carving their dies, then sitting over a big stump, hammering out the day’s site tokens. Several hundred can be made in a day. I’ll admit, yours have a lot crisper imagery!
Fun write up! Thanks.
thorr-kan, I’m relatively certain that coins have never been made by sintering in any appreciable numbers (maybe *never* before – I’ve never seen it) – it’s a relatively new technology, and it’s not efficient for big numbers.
Am I 100% sure this was the way to go? Only time will tell. if there ends up being more than a few hundred coins called for, then yes, for sure, cutting dies would have been more efficient. But there are other bonuses to having gone this way, one of which you touched on; detail and depth. The detail is at least as good as a struck coin and the depth is even better. The second is that I learned a whole lot about this process and can apply it to a bunch of other things, like guards, bolsters, pommels, menuki, and handle scales. It will change my knife making style in a big way.
The last and most important plus is that these coins have a legitimate “old” feel. They’re solid bronze, heavy, and there’s individual variability that only comes with hand made. There’s no comparing the mass produced zinc coins to these when you hold them in your hand.
I’m glad you liked the write-up! Thanks!
Todd, thanks for the reply. Learning experiences are always good!
The coins our SCA guild usually stamps are some variant of pewter (I think), so they’ve go some heft. Bronze would be really, really cool, though.
I was surprised you chose such a high-tech way to produce these pieces. Powder metallurgy has grown tremendously and is used in all sorts of high-precision applications and 3D-printing with metals is done using powder-bed sintering techniques.
Out of curiosity, did you try and measure the final density of the pieces? Did they shrink at all?
DW, yes, I’m familiar with some of what’s being done with powdered metallurgy – some amazing things, indeed. The way I’m using it is fairly low tech in comparison. It just happens to be the simplest way to get the end product we were looking for.
I didn’t measure the final density – and I don’t think I could do so very accurately. They shrank very little – somewhere a little under 10%. I use very little binder and seem to be getting a very complete sinter – both of which will reduce inter-particle voids. I did do some destruction testing that included annealing and bending, drilling, and cutting. The annealed bronze bends exactly as you would expect bronze to bend. It drills cleanly and throws a solid curl, and it saw cuts just how you would it expect it to. I’ll bet it can’t be told apart from any other bronze without either electron microscopy or very precise density testing.
Getting this process right was challenging, but well worth it, both for these coins and for future projects.
Real metal coins! These are incredibly cool! Also, thank you for the excellent explanation of sintering – I’d heard of this before, but never had a good description of what it was or how it was done.
Your articles are always interesting, informative, and entertaining. Every one leaves me looking forward to the next one. :)
I feel compelled to point out that I wrote an article on making coins a couple of years ago, but my process was far more arts-n-crafts plastic-intensive than yours.
Making coins for use in your game:
Part 1: https://koboldpress.com/k/front-page13705.php#.VClZSxbvN7A
Part 2: https://koboldpress.com/k/front-page13716.php#.VClYbxbvN7A
Charles, that’s a good write-up, and a clever, low cost solution.
I actually looked at using stamps to create masks for etching coins, but as you pointed out, it’s not a great method for fine detail.
And now I’m holding the coin in my hands (yes, late to posting)! This is a very cool item.
Wow! A comment almost a year later, that may be a record. I’m happy you like it!