Throughout 2023, a roster of Kobold Press superstars are working together to create a full dungeon for the Dungeon23 project. Each installment contains a few areas that will stack up to a full delve! Catch up on previous articles here.
Dungeon 23 Community Highlight
Richard Green, a frequent Kobold Press freelancer, has been posting individual rooms to the Kobold Press Discord server, and he has been kind enough to collect each week’s entries on his game design website.
Dungeon Prompts
I’ve been given seven words to help inspire dungeon design:
- Misty
- Noxious
- Incandescent
- Parched
- Military
- Volatile
- Even
I don’t need to use any or all of them, but they are cues to consider using when searching for inspiration.
The Dungeon Map
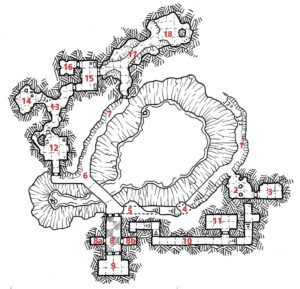
This level of the dungeon uses a Dyson Logos map, Wylgarak’s Hole (use this link for a player version without area numbers).
This map offers diverse paths for the PCs to explore while pursuing their adventure hook, which should resolve in Area 18.
This installment of the dungeon covers areas 1–3 of level two.
Area 1: A Rude Welcome
| Stairs lead down to a narrow path circling a bubbling lake at the bottom of a sloped cliff. High-pitched hissing emanates from the liquid. Green, glowing fog rises from the lake, partially obscuring your vision and making your skin itch and burn. |
The path around the lake best fits Small creatures, but PCs who are Medium or smaller can traverse it without difficulty. The lake’s surface is a 40-foot drop from the path. Due to the slope and the drop into liquid, a creature falling into the lake takes 7 (2d6) bludgeoning damage. The lake—filled with alchemical runoff—presents immediate danger to creatures submerged in its still currents. A creature in the lake at the start of its turn must make a DC 12 Constitution saving throw, taking 7 (2d6) acid damage and becoming poisoned for 1 minute on a failed save, or half as much acid damage and not poisoned on a successful one. Climbing the slope requires a successful DC 10 Strength (Athletics) check.
The vapors steaming off the lake are also dangerous. Each creature that spends 1 minute in this area must succeed on a DC 10 Constitution saving throw or take 5 (2d4) acid damage and become poisoned for 1 minute.
PCs who search the path and make a successful DC 10 Wisdom (Perception) check locate a ring of bravado (see Vault of Magic), which sadly didn’t help the previous owner.
Of course, the kobolds have left traps along the entrance to this dungeon level. A pressure plate at the location marked “1” on the map causes four spring-loaded greased logs to thrust out of and back into the wall at random times for 1 minute. The log adjacent to the pressure plate immediately shoots out, making the following attack:
Log Attack. Melee Weapon Attack: +4 to hit, reach 5 ft., one target. Damage: 7 (2d6) bludgeoning damage, and the creature must succeed on a DC 13 Dexterity saving throw or fall into the lake.
PCs attempting to traverse the swinging logs must succeed on a DC 13 Strength (Athletics) or Dexterity (Acrobatics) check or be automatically hit by the log attack. A successful DC 13 Intelligence (Investigation) check notices the pressure plate standing out slightly from the surrounding stone. A separate successful DC 13 Intelligence (Investigation) check reveals the logs’ pattern, granting creatures traversing the logs advantage on their checks.
A successful DC 15 Wisdom (Perception) check reveals a kobold trapsmith (see Tome of Beasts 1) peering around the corner from the passageway to Area 2 to appraise the trap’s effectiveness.
| Designer Insights: If You’re Trappy and You Know It… Kobolds are known for their traps, so it shouldn’t be a surprise they’d choose to greet intruders with one. Due to the hazard presented by the lake, the PCs have numerous ways to circumvent it (including waiting it out). |
Area 2: Trapsmith’s Workshop
| The acridity of the path around the lake gives way to odors of oil and smoke. Shelves filled with tools and liquid-filled flasks line the walls of this irregular room, and sawdust covers the floor. Obvious traps in mid-development rest on two tables in the room’s center. |
A pair of kobold trapsmiths here are far more interested in building traps than fighting intruders. If the PCs interact with them, a successful DC 12 Charisma (Persuasion) or DC 14 Charisma (Intimidation) check convinces them to reveal most traps they built on this level. However, they withhold information about alarms they set up, including the bells in Area 3. The trapsmiths attempt to escape when combat starts or when a PC reaches the door.
Among the trapmaking tools and alchemical supplies, PCs can find a vial of acid, a flask of alchemist’s fire, a vial filled with pale tincture poison, and potions of buoyancy and transparency (see Vault of Magic).
The poison and potions radiate magic for purposes of detect magic. Each item is clearly labeled, but the trapsmiths anticipate that looters will suspect trickery and drink the poison expecting something else.
PCs searching the southern wall who succeed on DC 13 Intelligence (Investigation) checks find the secret door concealing the corridor to Area 10. The trapsmiths know about the door and might tell the PCs about it if they think the information will save their lives.
| Designer Insights: A Slight Subversion of Expectations Players and their characters are typically suspicious of items they find in a dungeon. Plainly stating an item’s identity further arouses suspicions. Playing on this expectation might seem cruel, but when the consequences are relatively painless, it can be a fun jolt. |
Area 3: A Moment’s Reflection
| Sconces adorned with flaming torches ring this chamber. Eight mirrors cover the walls. |
The kobolds on this level wrangled a chroma lizard (see Tome of Beasts 3) from the surrounding area and the trapsmiths prepared this room to study it.
The trapsmiths feed the lizard sleeping elixirs to keep it docile, but it awakens if attacked or it hears a loud noise.
If the PCs notice the lizard’s reaction to the mirrors with a successful DC 10 Wisdom (Insight) check, they can smash the mirrors (using an action to destroy one mirror) to gain the creature’s trust. Then a successful DC 12 Wisdom (Animal Handling) check convinces it not to attack. Otherwise, the lizard fights to the death.
The kobolds rigged the door with a wire connected to a network of twelve bells hanging from the ceiling. Opening the door triggers the bells to ring. PCs notice the tripwire with a successful DC 13 Intelligence (Investigation) check, and they can disarm the bells with a successful DC 13 Dexterity check using thieves’ tools.
| Designer Insights: Mini Boss The chroma lizard presents an unexpected challenge for PCs and might elicit questions about its presence in the dungeon. |
Delving Deeper
In two weeks, we continue to skirt around the lake in Areas 4–6.
If you’re looking for a notebook to jot down your Dungeon 23 ideas, check out the Kobold Press TeePublic page!